It can be difficult to select the right Linux distribution for you because of the increasing number of users of Linux over time and the variety of releases that occur frequently. Whatever your demands, there is a Linux distribution out there that will work for you as Linux is open source and not governed by a single manufacturer. It can be difficult to choose the right distribution, though.
Rocky Linux is an open Linux distribution that split from CentOS to eventually take its place when Red Hat decided to stop supporting it. It is a perfect operating system for numerous uses because it is suitable with the source code of the RHEL operating system. Because it works well with Enterprise Linux, it’s practically a drag-and-drop solution. It’s also a great option for your desktop apps and servers in addition to being incredibly user-friendly and reliable. Rocky Linux was and remains the best choice because many IT professionals use CentOS frequently and have been searching for solutions ever since RedHat stopped providing support.
The co-founder of CentOS also happens to be the founder of Rocky Linux, so with great promise and potential, he not only attempted to make something sustainable and replace CentOS, but he additionally developed something that may address CentOS’s faults. The result is an operating system whose features are highly functional, secure, and adaptable to any environment.
Rocky Linux OS Overview

Licensing:
Rocky Linux is the free edition of RHEL, which costs $349/year. Some Red Hat features are inaccessible since it runs as an unlicensed RHEL.
For example, the kpatch live kernel patching feature is included in RHEL 8.1. Rocky Linux does not support it, so the task must be completed using a third-party paying service.
The Rocky Linux project licenses all aspects of it under the 3-Clause Berkley Software Distribution (BSD). This pertains to reusing, redistributing, and modifying the operating system.
Rocky Linux, as a distribution, contains several packages or applications under various licenses. When utilizing an Operating System (OS), you must follow its regulations.
Storage Facilities:
For each major version, Rocky Linux offers a distinct set of base repositories. Installable from the extra repositories are the ones that have been accepted by the community as well.
Three different types of repositories are supported by Rocky Linux and can either be installed manually or are included by default:
Base: These are the pre-installed default repositories in Rocky Linux.
Extra: is a collection of extra programs designed to enhance the functioning of your system. Installing the community-approved repositories requires the use of certain of them.
Community-approved: repositories are those with unofficial packages that come from outside vendors. They can be obtained for additional enterprise Linux distributions as well.
Specifications:
Rocky Linux is suitable with the majority of its features as a RHEL clone. Nevertheless, several proprietary ones, such as Red Hat Satellite and live patching, are exclusive to RHEL.
Rocky Linux is an enterprise distribution, but it has features that make it useful for home use as well. The following are a few of them:
Graphical User Interface (GUI): Rocky Linux boasts an excellent UI. For people who are not used to a command line interface, it is extremely useful.
Desktop environment – The default desktop interface for this Linux distribution is GNOME 40. Rocky Linux’s new settings, UI, and programs make it perfect for home usage.
XFS file system – XFS is designed for handling enormous amounts of data while maintaining performance. Rocky Linux can therefore be used with enterprise-class storage and server arrays.
Up-to-date compilers – Rocky Linux’s GCC compiler allows developers to improve and troubleshoot their code quickly. For optimum performance, it also increases the efficiency of hardware consumption.
Module packaging – Rocky Linux supports a variety of package management systems, including Flatpaks and RPM Packages Manager. They make it easier for developers to install and utilize the packages they want.
System monitoring- For performance monitoring, Rocky Linux is compatible with the Cockpit web panel. It aids in finding problems with unusual resource and network utilization.
Security:
Rocky Linux implements the Security-Enhanced Linux (SELinux) platform. It gives administrators additional control over the system’s access permissions.
SELinux isolates data based on confidentiality and utilizes security policies to evaluate access requests. These policies specify which data is easily accessible as well as what is not.
Unlike CentOS, Rocky Linux supports security-focused package management. It allows you to search for existing security updates and select which one to install.
Rocky Linux’s current stable version offers various features that help increase your VPS security, such as:
OpenSSL is a framework that allows for data transfer over a secure connection to a Rocky Linux system. To boost security, it mandates the 2048-bit RSA encryption key in crypto-policies.
OpenSSH is a connectivity tool that allows you to safely connect with the Rocky Linux server through the SSH protocol. It now includes the option to utilize SHA-1 for signing.
SHA-1: Due to security concerns, Rocky Linux 9 no more supports SHA-1 for the majority of cryptographic uses.
Security compliance – Rocky Linux configures its settings to adhere to data protection requirements. It saves time and prevents misconfigurations.
How to Install Rocky Linux on VirtualBox
Virtual machines (VMs) provide an excellent technique to deploy many servers without purchasing additional hardware. Apart from that, they also make it simple to capture snapshots of the current running state, allowing you to always roll back if something goes wrong.
Furthermore, virtual computers are ideal for testing applications, operating systems, services, and a lot more. You may run a guest VM on a system, test it for as long as you need, and then transfer it to the live network when it’s ready for production.
VirtualBox is one of several platforms that make it easier to manage virtual computers. VirtualBox is popular (and well-liked) in the open-source community, and it does an excellent job of allowing many different operating systems (such as Rocky Linux) to be used on a single host.
Download and Install Rocky Linux 9 in VirtualBox
Rocky Linux 9 is the most recent version of Rocky Linux, with improved performance and security, as well as a new repeatable build method. Install Rocky Linux on VirtualBox using the instructions below.
Download the ISO and then set up VirtualBox
Before downloading Rocky Linux, install the Rocky Linux 9 ISO and set up a virtual machine in VirtualBox using the instructions below.
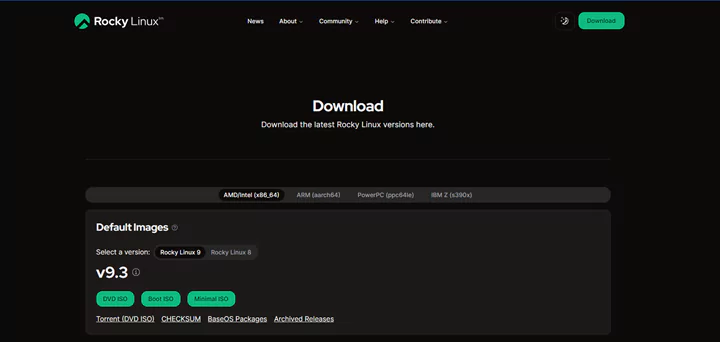
Step 1: Download the Rocky Linux ISO
Go to Rocky Linux official website and select the Rocky Linux ISO file for your CPU architecture. The ISO is available in three kinds:
Minimal and boots: To install the OS from a different source (such as an HTTP repository) or enter Rescue Mode.
DVD: A full Rocky Linux installation that includes the BaseOS and AppStream repositories. This is the simplest and most popular way to install Rocky 9.
Step 2: Create a New Virtual Machine
To establish a new virtual machine, open VirtualBox and select the New button.
Step 3: Select the OS Type
In the pop-up windows, select the following settings:
Name: Give the virtual machine a name that indicates the operating system it is running.
Machine Folder: Choose where to save the files needed to execute the VM. If it’s not important to you, stick with the default destination.
Type: VirtualBox will automatically estimate the OS version according to the VM name and must choose Linux. If not, select Linux from the drop-down selection.
If you are using a 64-bit architecture, select Red Hat (64). If you are using x86 architecture, you can also select Red Hat (32-bit).
After specifying all of the settings, click Next.
Step 4: Choose RAM Size
Determine how much RAM the VM should have based on the resources of the host machine. The minimum needed is 2GB, however, additional RAM improves performance.
Drag the button or enter the required RAM amount, given in megabytes.
Click Next to go to the next phase.
Step 5: Setup Hard Disk
The following step is the generation of a virtual hard disk on the virtual machine. Choose the Create a virtual hard disk Now tab and then click Create.
Alternatively, you can choose a preexisting hard disk file or ignore this step if you intend to create one later.
Step 6: Select the Hard Disk Type
Select one of three kinds of virtual hard disks. All three types offer dynamically allocated storage.
VDI: The default disk type for VirtualBox. Other virtualization software does not support VDI, but VDI can be easily converted to other formats.
VHD: The native format of Microsoft Virtual PC. The replacement is VHDX, however, VirtualBox does not support it.
VMDK: Developed by VMware, but backed by VirtualBox. Choose VMDK for maximum compatibility with different virtualization applications. VMDK may also divide a large storage file into files smaller than 2GB apiece, which is ideal for file systems with minimal file size limits.
Step 7: Select the Storage Type
VirtualBox provides dynamically allocated or fixed-size storage. Its preset size is quicker to use, but it cannot be changed afterward.
Dynamic storage takes up more space as it fills, up to a maximum set size, but it cannot be shrunk.
Choose your type and then click Next.
Step 8: Set the Disk Size and Location
You may choose the disk file destination or leave it as default.
Adjust the disk size with the slide or the box that appears. The minimal storage capacity for Rocky Linux is generally 20GB, with a recommended size of 40 GB.
Given the disk type you selected in the previous stage, you can either provide the fixed, basic disk size or the maximum possible capacity for dynamic storage kinds.
Select Create then wait for the setup to to be completed.
Step 9: Setup VM Settings
When the disk creation is finished, the creation wizard appears, and the newly created Virtual Machine shows up on the left-hand side of the VirtualBox display.
Choose the latest virtual machine and click Settings to set it up for Rocky’s installation.
Step 10: Configure CPU
Allocating an appropriate number of processing cores ensures that the VM performs optimally.
1. In the System settings, select the Processor tab. Drag the slider to assign the necessary number of cores, or input it into the box.
2. Press OK to preserve your changes.
Step 11: Attach Rocky ISO
Mount the uploaded Rocky ISO image in the virtual CD drive.
1. In the Storage options, click the Empty disk icon.
3. On the right-hand side of the display, in the Attributes section, select the disk icon alongside the Select a disk file… option.
3. Locate and pick the Rocky Linux ISO image you downloaded.
When the ISO image is successfully attached, it is displayed in the Internal Devices part, under Controller: IDE.
Choose OK to save your changes.
Now, How to Install Rocky Linux
After establishing the VM using VirtualBox, follow the instructions to install Rocky Linux.
Step 1: Start VM
Click Start to start up the virtual computer with the Rocky ISO installed. This begins the OS installation.
Step 2: Start the Rocky Installation.
After launching the VM, the Rocky startup menu shows.
1. Click upon the Install Rocky Linux 9.0 button and press Enter to begin the installation.
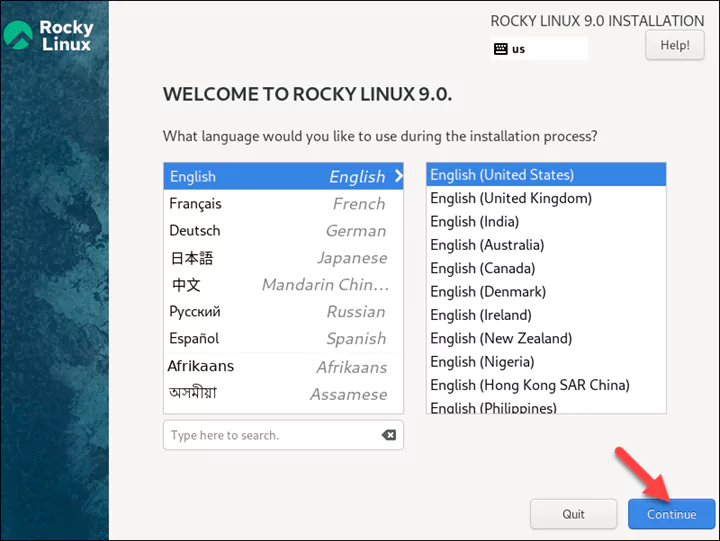
2. When the installer launches, select the language to be used during the setup process and click Continue.
Step 3: Configure Rocky Installation.
The installer begins with an installation summary menu, where you can configure the most significant parameters for the OS installation:
To set up and run Rocky Linux, take the following steps:
- Click the plus button and select one of the supported keyboard layouts. Check the layout to check it’s proper.
- Click Language Support to install more languages.
- Set the time and date for your OS by choosing the region and city from the option lists and entering your time and date in the bottom section of the screen.
- Select a base environment and additional software from the Additional Software menu.
- Click Done to save the settings and return to the installation menu.
- Choose the installation location and partitioning methods. Under Storage Configuration, select Automatic or Custom to automatically configure the storage or build custom disk partitions.
- To proceed with partitioning, click Done.
- Create the system’s administrator password by providing a secure password and confirming it. Enable remote SSH logins by selecting the Enable root SSH login using password option.
- Make a fresh user account for the OS by providing your name, selecting a username, and creating a secure password. Retype your password and verify the password strength indication.
- Select OK to save your changes.
- To finish the installation, shut down the virtual machine (VM) and navigate to Settings -> Storage. Unmount the ISO and then choose the Remove Disk from Virtual Drive option. Start the virtual machine and patiently await for the system to boot up. Log in to Rocky Linux using the generated user account(s) and enter your password.
How to Install Rocky Linux on VMWare
Rocky Linux can be tested using virtual machine tools like VMware. Hypervisors enable a host machine to isolate hardware resources and provide them to the virtual machine.
Prerequisites:
- The host OS might be either Windows or Linux.
- VMware Workstation is installed.
- The Rocky 9 ISO file is accessible on the official site. The guide employs Minimal.
Downloading Rocky Linux on a virtual computer requires some additional VMware configuration. The procedure consists of two easy steps:
1. Set up the Rocky Linux virtual machine and its hardware settings.
2. Set up Rocky Linux on the virtual machine.
Each step is explained in detail below, so you can follow along.
Step 1: Setup and Install the Rocky Linux VM
To construct the Rocky Linux virtual computer, launch VMware Workstation and:
1. To build a new VM, select File -> New Virtual Machine. Alternatively, you can use the key CTRL+N.
The wizard for creating a new virtual machine opens.
2. Click Next while leaving the Typical (recommended) setting option selected.
3. Select the “I will install the operating system later” option and click Next.
4. Change the Guest OS to Linux. Open the dropdown option and select Red Hat Enterprise Linux 8 as the version. Click Next to continue.
5. Enter the guest’s OS name (Rocky) and the installation location. Click Next to proceed.
6. Enter the disk capacity and then click Next to start. The minimum required is 20 GB.
7. The final construction page allows you to customize the virtual machine’s hardware specifications. Select the Customize Hardware button. The hardware customization window opens.
8. Enter customized settings for these options:
- Memory (at least 4 GB)
- New CD/DVD (SATA) (please specify the ISO image file location)
- Network adapter (choose Custom VMnet0 (Bridged))
- To dismiss the hardware setup window, click Close
9. Once you’ve reviewed the changes, click Finish.
The Rocky Linux OS is now prepared for setup on the virtual computer.
Step 2: Set up Rocky Linux on the VM.
To begin the Rocky Linux OS setup, select Power on this virtual computer.
The virtual machine screen opens.
To set up the installation of the OS, follow these steps:
1. Using the arrow keys, pick the Install Rocky Linux 9.0 option and hit Enter. Wait for the installation to load and launch.
2. Select the language and keyboard layout. Press Continue to confirm your choice and proceed.
3. Configure the necessary installation choices. In the System section, select Installation Destination.
4. Choose the installation DVD and click Done.
5. Next, configure the Root Password account in the User settings.
6. Select a strong password to the root account and select Done. The minimum needs are established.
7. Examine the installation summary. When you’re ready, select Begin Installation to begin the installation. Wait for the installation to be completed.
8. Once the installation is complete, click the Reboot System tab.
9. Login with the root account (username root, password from step 6).
The virtual computer with Rocky 9 is ready for usage.
Also Read: How to Install Ubuntu on Windows 10 / Windows 11: A Beginners Guide
Conclusion
In this beginners guide author provides a detailed step by step guide for users looking for install Rocky Linux an open-source distribution associated with CentOS. As this article covers the essentials there is always room for more exploration. As it covers step by step installation guide for VMWare & VirtualBox. This article will help user to begin their journey with Rocky Linux Confidently.