Open-source projects which hosted in public files receive contributions from the larger developer community and are often handled with Git. Git is a distributed version control system, which allows individuals and teams to contribute and maintain open-source software projects. Git, an open-source project, is also free to download and can be used.
Open-source software is freely available and can be used, distributed, and modified. Projects that use the open-source development model promote an open approach that is improved by distributed feedback from peers. These projects can be updated instantly and as required providing dependable and adaptable software that is not based on closed proprietary systems.
Contributing to open-source projects helps to guarantee that they are feasible and they also reflect a wide range of technological end users. When end users contribute to open-source projects via code or documentation, their different perspectives benefit the project and the greater developer community.
What is a Version Control System?
A version control system keeps track of any modifications that are made to any project file, including why they were done and the references to problems solved or improvements carried out. It allows development teams to monitor and track code changes over time. It also enables users to go back to prior file states, compare versions, and easily find flaws in files.
What is Git?
Git is one technique to implement the concept of version control. It is a Distributed Version Control System (DVCS). Unlike a Centralized Version Control System, which needs a central server to store all files and allows for team collaboration, a Distributed Version Control System can be constructed using only a desktop computer and a single piece of software accessible via the command line. So, the Distributed Version Control System is unaffected by the central server’s failure, and also any operations can be conducted while you are offline.
Git is a very popular software version control system. In 2005, Linus Torvalds developed Git. The software’s current maintainer is Junio Hamano who also used it to work on the Linux kernel. Many projects store their files in a Git repository and platforms like GitHub, GitLab, and Bitbucket enable code sharing and contributing.
In Git, each working directory is a complete repository with full history and tracking independent of network access or a central server. Version control is now a critical tool in contemporary software development because it lets you follow software down to the source code. Members of a development team can track changes, restore to previous stages, and branch off from the source code to produce different versions of files and folders.
Why Is Git So Popular?
Git is a popular version control among developers due to several significant benefits:
Distributed Version Control: Each developer is to keep a copy of the project’s history. In Git people can work offline and independently which also makes their collaboration easier.
Open Source: Git is open-source and free to use. It comprises a vast number of developers.
Speed: Git is extremely fast and it doesn’t need to connect to a central server for its operations, It makes quick changes and can switch between branches.
Branching and Merging: You can create branches for various features or bug fixes in Git quickly. After completing that work, you can re-merge changes back into the project. If something goes wrong, correcting or reverting mistakes is straightforward with straightforward tools in Git.
Data Integrity: The project’s history is secured in Git. Data loss is nearly impossible, and there’s virtually nothing difficult to retrieve once it’s been saved. Any change made to any code of files or work in Git is recorded, traced, and associated with a unique Git ID tag at the checkout.
Community and Support: Git has a native community of users who make it easy to understand and share their software. Throughout Git’s open-source commitment, countless software providers and the fastest-growing form of collaboration.
Security: Unauthorized users are unable to change or remove data.
For developers looking to collaborate and maintain code organization, Git is a great option for effectively managing many software project versions.
Who uses Git?
Git is used by a wide range of people – software developers, open-source project contributors, and system administrators. It’s an essential tool for managing large code bases, coordinating work among team members, and keeping a project’s history alive.
Git is used by many companies, including:
Many well-known companies use Git, some of them are-
Microsoft uses Git for their version control system including the open-source.NET Core and Visual Studio Code.
Google uses Git to manage the source code for Android, Chromium, and several other projects.
Adobe: Adobe uses Git for its version control and to collaborate across their software development teams.
Airbnb: Git is an essential part of Airbnb’s software development progress. It allows engineering teams to collaborate on multiple projects.
Advantages of Using Git
Git has various advantages that make it the preferred choice for version control and collaboration. Some of the advantages include:
1. Quick and Efficient: With fast and efficient functionalities, Git is capable of managing large code bases with many contributors easily and conveniently. Its design promotes performance above resource utilization.
2. Distributed nature allows for offline work: Git’s distributed nature makes it possible for developers to work on their local repositories when offline. This allows them to make changes and commit them while not connected to the internet. The modifications can be synchronized with the remote repository after connecting to the internet once more.
3. Branching and merging capabilities: The ability to branch and merge code with Git enables developers to work on different features or bug fixes in separate branches while keeping the main codebase stable. Reintegrating changes into the main branch is a straightforward procedure.
4. Collaboration support: Git was designed to help with the cooperation between developers. It allows developers to work on the same project without any disagreements or disputes. It also helps track modifications by assigning them to the correct contributor.
5. Widely used and supported: Git is a famous platform many developers use for its numerous tools and services. Its vast community and quick adaptation make it a versatile option.
Git Prerequisites:
Let’s briefly go over some prerequisites to make sure you’re ready to start using Git before we dive into the installation procedure. You won’t need much, so don’t worry:
Basic Computer Knowledge: It is necessary to be familiar with the use of computers. You don’t have to be an expert, but knowing your way around the operating system and file management is beneficial.
Command line/ terminal experience: Git operates mostly through the command line (or terminal). If you’ve never used the command line before, you might want to brush up on the basics. You don’t need to worry about it; you will understand as you use it more.
Expertise with programming (optional): While it can be useful when dealing with Git, some programming expertise is not required. Git can be a useful tool for project management even if you’re not experienced with coding.
How to Install Git on Windows 10/ Windows 11?
System Requirements
Git works with a variety of operating systems, including- Windows 7, 8, 8.1, and 10;
Because of low hardware requirements, Git can be used with plenty of platforms. Although there aren’t any hard and fast minimum standards, having:
RAM of at least 1 GB, while 2 GB or more is recommended for best results.
For the Git installation, you will require at least 50 MB of free disk space; however, you will also need additional storage for your repositories.
Install Git on Windows 10/ Windows 11
Conditions required-
- An admin user profile.
- Having the use of a command-line utility.
- The text editor you prefer for coding.
- Login credentials for the GitHub website (optional).
Step 1: Download the Windows Installer
The current version of the Git installation for Windows can be downloaded from the official Git website. The download should begin automatically when you view the page.
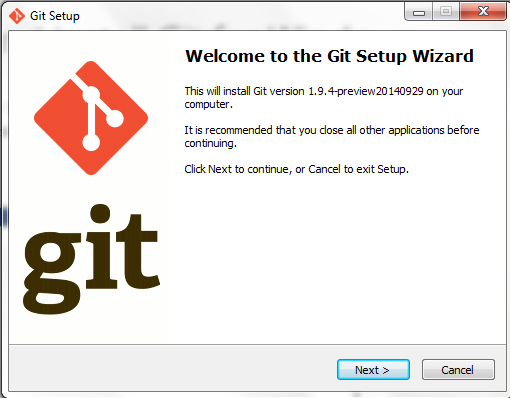
Step 2: Run the Installer and select Options.
Open the downloaded installer and follow the installation instructions. Confirm that the app can make modifications to your device by clicking Yes in the User Account Control popup that displays.
-The installer will request the installation location. Keep the default settings unless you need to change them, then click Next.
-A component selection screen will be presented. Keep the default settings unless you need to change them, then click Next.
-You will be invited to create a Start folder. Keep everything as it is, then press Next
-Choose a text editor for usage with Git. Click the drop-down menu to select your preferred text editor, such as Vim or Notepad++, and then click Next.
– In the following step, you can choose to rename your initial branch. The default setting will be as master. Leave the default value (unless you truly want to modify it) and click Next.
-You’re now ready to alter the PATH environment. Leave this as the suggested option, Git from the command line and third-party software, and click Next.
-Selecting the desired SSH program must be done on the next screen. Leaving the default options ticked is acceptable because Git comes with its own SSH client. Next should be clicked.
-This option has to do with server certificates. Using the OpenSSL library should be the default option selected by most users. Select Next.
-The conversion of line ends is covered on the following screen. Leave it at Checkout Windows-style, commit Unix-style line endings, the default setting. Modifying this setting could result in problems. Select Next.
-The next step is to select the terminal emulator. The default MinTTY is suggested. Click the Next button.
-The next screen will ask you what the git pull command should do. Again, the default choice is advised. Click the Next button.
-You will need to decide which credential assistance to employ next. Keep the default setting selected and then click Next.
-Next, you will be offered additional options to customize your installation, including:
Enable file system caching.
Enable symbolic linkages.
Once you’ve made your selections, click Next.
-If you are installing a newer version of Git, you will be prompted to select experimental features. As of this writing, the alternatives are:
Support for pseudo-consoles.
Built-in file system monitor.
-Check any boxes you want (or none), then click Install.
-On the last screen of the installation, you can browse the Release Notes or launch Git Bash. Check the boxes next to the options you choose, and then click Finish.
Step 3: Use Git Bash to confirm the installation
Use the following command in Git Bash to verify that Git has been installed correctly:
git --version Press Enter, and the name of the Git version you just installed should show.
Also Read: A Step-by-Step Guide to Download and Install Azure Data Studio
Conclusion
Now that Git has been installed and configured on your local machine, you may use it to version control your software projects as well as contribute to public open-source projects.
Git should be updated regularly. Adding your contributions to open-source software is an excellent way to become more active in the larger developer community while also ensuring that software created for the public is of high quality and completely representative of end users.