GitHub is one of the most popular programming resources available for code sharing. It is a pay-for-use along with it also provides free plans for public repositories for a software development platform that makes it easier for developers to share code files and collaborate with fellow developers on open-source projects. Its benefits include seamless collaborations, templates, integrations, and repositories that give your work and project the exposure that it requires. GitHub has a growing and large community of developers and repositories.
Understanding GitHub is essential for novice developers, as it helps you find source codes in various languages and use the command-line interface, Git, to make and keep track of any changes. Further, understanding the software allows every team to collaborate on projects remotely.
Why is GitHub so Popular?
GitHub was launched in 2008. It made it incredibly easy to host repositories and collaborate with other developers, and soon Git became the go-to version control system for open-source projects. GitHub is an easy enough software that helps individuals manage other projects, such as journals. More importantly, anybody can sign up and host a GitHub public code repository at no cost. Which is why it is popular with open-source projects.
What Does Cloning a Project from Github Mean?
Cloning a repository simply means that you copy the repository from GitHub to your local machine. A full copy of all the repository data that GitHub has at that particular point in time, including all versions of every file and folder for the project, is pulled down when you clone a repository.
What is the Purpose of Cloning a GitHub Project?
Cloning the repository from GitHub and saving it on your local computer allows you to easily correct merge conflicts, push larger commits, and add or remove files, and it can help streamline the process of contributing to a project. By cloning a repository, you are simply making a copy of the repository and saving it on your local desktop. You can either clone your existing repository, or you can opt to clone one created by another user.
How do You Clone Projects from GitHub?
To clone a repository with the GitHub desktop client-
STEP 1: The first step would be to sign in to your GitHub account. This is done by opening the “file” option on the menu bar, clicking on the “options” menu, and then clicking on “accounts.”
STEP 2: Now, let’s say that you’ve come across a repository of interest that you want to clone, so you can either collaborate on the project or just install it.
STEP 3: Locate that project on GitHub and click the code drop-down, where you will see the URL for the particular repository.
STEP 4: Copy that link, and then go back to the GitHub desktop client. Click the “file” option on the menu bar, then click “clone repository,” and in the window that pops up, click the URL Tab and paste the URL for the repository in the URL field. You can also change the local directory that will be used to house the cloned project.
STEP 5: Click “Clone,” and the repository will be cloned into the local directory shown in the local path field.
The local repository is associated with the particular GitHub repository during the cloning process, which is referred to as the “origin.”
How do You Clone a Project from the Command Line?
This method is even easier provided that you have Git installed on your machine. Once you have copied the URL from the repository you wish to clone, open a terminal window and issue the following command:
git clone <URL of the Repository> Once the clone is complete, you should be able to find a new directory named after the project.
And that is all there is to cloning a repository from GitHub. Using the GUI or the command line is up to you, either way cloning a repository is an easy process.
Steps to Clone GitHub Project in Mac Edition
STEP 1: Navigate to the main page of the repository you wish to clone.
STEP 2: Next, click the “< > code” button and you will see a URL pop up. Click the “copy” button, which will allow you to make a copy of the URL for the repository.
STEP 3: Next, you will have to open Terminal on your Mac. You can do this by simply opening your Launchpad and searching “Terminal.”
STEP 4: Once you open Terminal, type CD and specify where exactly you want your cloned directory to be saved.
STEP 5: Then, right-click on the folder in Finder select “Copy [folder name]” and copy the path onto your clipboard.
STEP 6: Paste the folder path into Terminal and finally, type “Git clone” and paste the URL you copied in GitHub. Click “Enter” and you’re cloned repository should be available to you on your local desktop.
What is Visual Studio Code?
Visual Studio Code’s user-friendly interface guides you through common Git actions like pushing and pulling code, creating and merging branches, and committing code changes. It enables you to perform Git actions directly within the editor, saving you time and effort compared to using the Git line command. The seamless workflow between Visual Studio Code and Git means that you can stay in your editor and get more work done.
How do you Clone Projects from GitHub using Visual Studio Code?
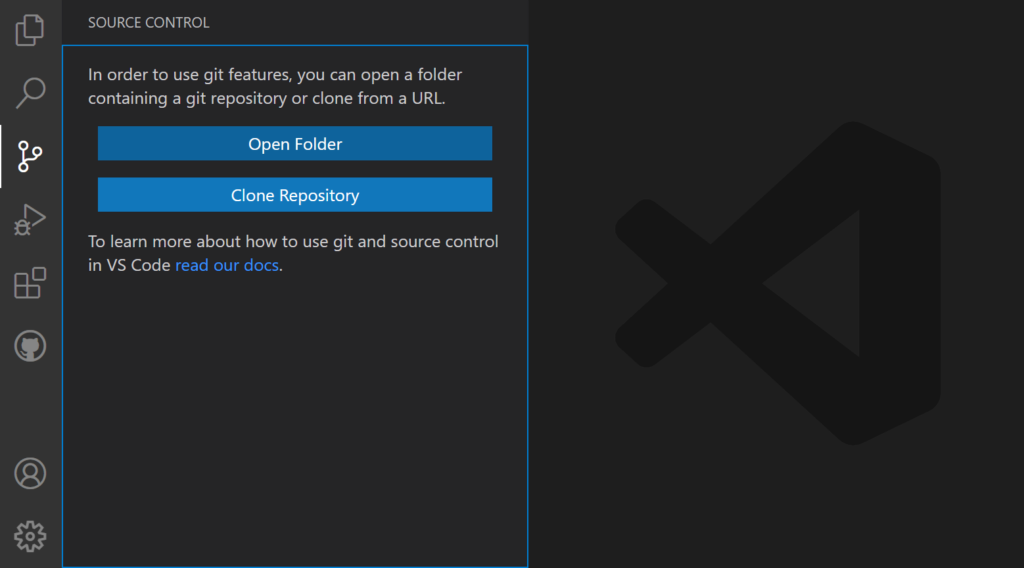
STEP 1: Find any GitHub repository you wish to clone.
STEP 2: Then click on the “< > code” button and copy the URL under HTTPS.
STEP 3: Next, open Visual Studio Code and press “Ctrl+” on your keyboard which should open up the Terminal.
STEP 4: Type “git clone” then press the spacebar on your keyboard and paste the URL into the Terminal. And that is it.
Visual Studio Code’s remote repository support allows you to browse and edit a repository without cloning it to your local computer. This can come in handy for quickly making changes to a remote repository without having to clone the entire codebase into your local desktop.
STEP 1: First, install the GitHub Repositories extension.
STEP 2: Then, run the command “Remote Repositories: Open Remote Repository.”
STEP 3: Finally, search and select the GitHub repository you want to open.
What is IntelliJ?
IntelliJ IDEA is an Integrated Development Environment that has been designed to maximize developer productivity. It provides clever code completion, static code analysis, and refactoring, and lets you focus on the bright side of software development.
How do You Clone Project from GitHub to IntelliJ?
The first thing you need to do is to clone the Git repository to your local desktop. There are numerous ways to clone a Git repository to your local desktop. You can use HTTPS or SSH, amongst other options.
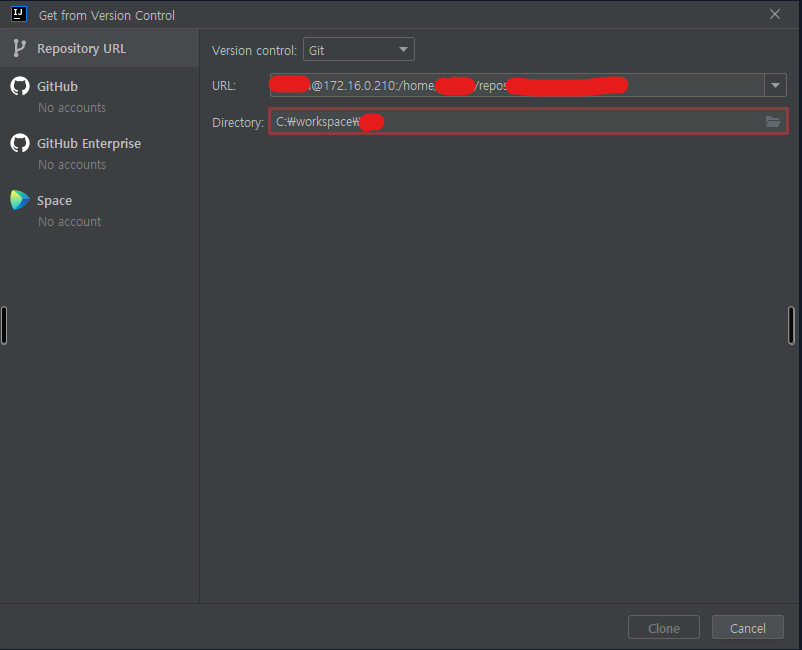
If you do not have any projects open when you first start IntelliJ IDEA, you will see a welcome screen. You will receive an option to get a project from version control. Clicking on this opens up the “Get from Version Control” dialog. The particular repository URL can be entered into the URL input box. You will then have to press “Enter” or click “Clone”, and IntelliJ IDEA will clone the repository to your preferred directory. It will also detect the modules in the project, and correctly set up the test, main, and resources folder. The result can be viewed in the Project window.
What is Eclipse?
Eclipse is an Integrated Development Environment used in computer programming. It contains a base workspace and an extensible plug-in system for customizing the environment. The use of Eclipse is for developing different applications, and it can also be used to develop applications in other programming languages via plug-ins.
How do you Clone Projects from GitHub to Eclipse?

To bring a GitHub project into Eclipse-
STEP 1: You have to first copy the GitHub URL of the repository to the clipboard.
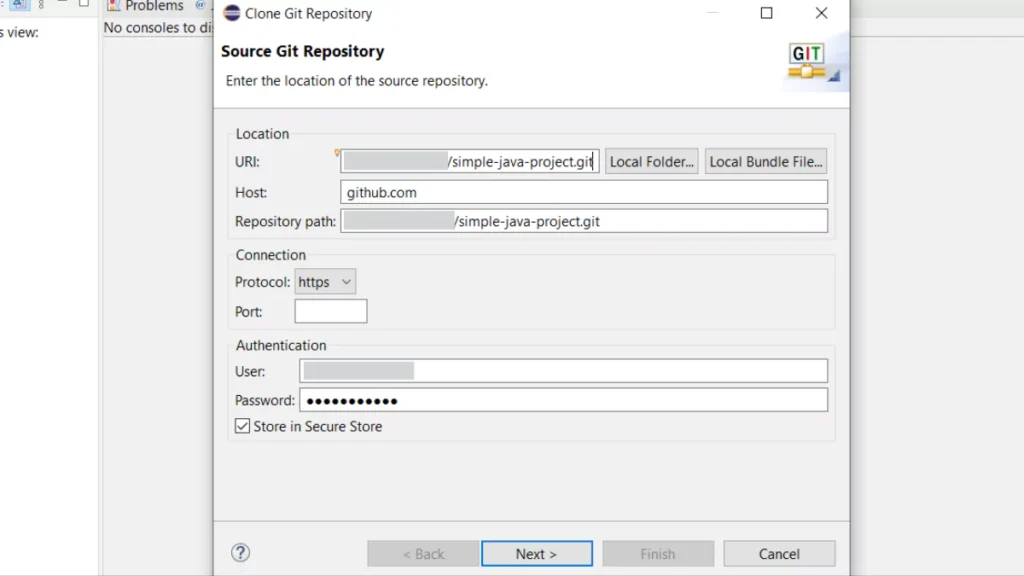
STEP 2: Then, you have to open Eclipse and choose “Import – Projects from Git (with smart import).”
STEP 3: Next, choose the Clone URL option in the Git import Wizard and click “Next.”
STEP 4: Make sure to confirm the URL, Host, and Repository path parameters before clicking “next.”
STEP 5: Then, choose the Git branches you want to clone from, from the remote repository and click “Next.”
STEP 6: Confirm the directory into which you want the repository to be cloned and click “Next.”
STEP 7: Choose a project to import in Eclipse from GitHub and then click “Finish.”
A few disconcerting error messages may appear, but that is normal. The project’s pom.xml file gets processed, and missing dependencies are pulled down. Until these dependencies and fully downloaded and installed, error messages will appear.
Troubleshooting Cloning Errors
It is normal to encounter some errors while cloning your repository. If you are not able to clone a repository, make sure that you are able to
- Connect using HTTPS
- Access the repository you wish to clone
- The default branch you wish to clone still exists
Conclusion
GitHub cloning is a fundamental process in modern software development that enables seamless collaboration, version control, and code distribution. Developers can efficiently access, contribute to, and build upon existing repositories. The significance of GitHub cloning persists as a cornerstone of agile development, empowering teams to iterate swiftly, share knowledge effortlessly, and propel the software landscape forward into new realms of possibility.